Friday, May 31, 2013

Hard Maple - they aren't kidding

Prior to making the cherry bench, I wanted to make a slightly less serious project. We need a coffee table and I like the look of the Stickley "fireside bench", so this is loosely based on that design. 

This is my first project in maple, and for the record, hard maple really earns the title of "hard". What a difference from working with poplar and pine. I think I already need to re sharpen pretty much everything I've used on it so far. 

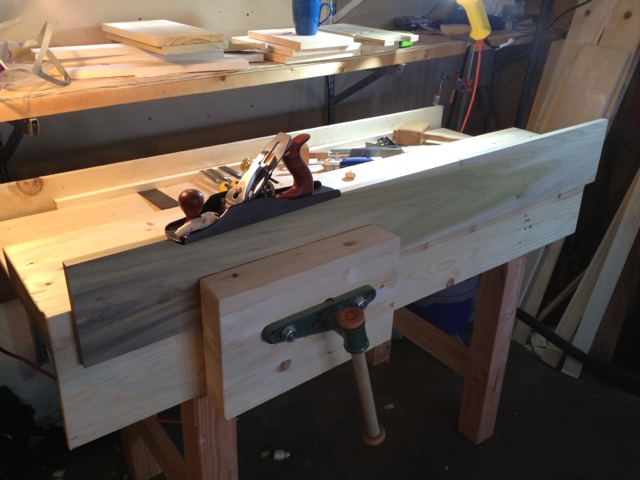
The first photo is of the initial laminating of the top.  While I am improving in my larger lamination skills, the required trying and truing took hours of hand planing to get reasonably flat.  I don't have a true scrub plane, but I now fully understand the utility of one.  I also picked up a nice long Stanley #7 which helped immensely for the longer runs.


This is the top of the bench withe some initial dry fitting and measurements for making the keyed tenons.  I realized after fitting that I did not do a shouldered tenon, which was a mistake.  I decided to place reinforcement blocks underneath to bolster it instead of cutting a new piece; I may change my mind before final assembly.


Sunday, March 10, 2013

Keyed mortise and tenon

The next project has keyed mortise and tenons, but before I ruin perfectly nice cherry pieces, I thought i should work out a few kinks. Here are the first few attempts. I'm trying to get a very slight 5 degree angle to the entry point, as the receiving mortise is a panel type leg for a bench, and has a slight tilt. I have already learned if you over tighten the key you will take a beautiful chunk out of the remaining mortise... So gentle taps only!


Friday, March 1, 2013

Poplar TV stand: 6 - Completed


Stained with Minwax "Red Mahogany", and Minwax Paste Wax.  We were going for a rustic, slightly "worn" look, which works well with my rustic, novice joinery.  The finish came out nicely.  We had read before that the poplar would take up the stain in a "blotchy" fashion, we did not use pre-finish, though we thought about it.  Looking back, it might have evened out the color, but it works nicely.  


The top being smooth-planed to reduce sanding.  We left a lot of the rough plane marks to enhance the desired appearance.   I had not accounted for the visibility of the wire-mess that emanates from my TV, so I might be adding some hideaway features shortly to hide the cables underneath.

Saturday, February 23, 2013

Poplar TV Stand: 5

The bottom shelf is done. Somehow I had a bit of an issue with fitting one corner. Lesson here I think is decide on the shelf design first and dry fit instead if trying to wedge it in and size it as you go. At least I learned a little repair work as a bonus. Next: attach top, sand, stain!


Small repair in the back corner, which ended up being the front.  It fit nicely.

Saturday, February 16, 2013

Gramercy Tools Holdfasts

I had seen a holdfast used many a time on The Woodwright's Shop and elsewhere, and finally saw a reasonably priced option available from Gramercy Tools. They work as advertised, and I am pleased. It is actually quite amazing how often I find myself reaching for one. As a bonus, my bench seems much more "legit" with dog holes in it ;)
We shall see where this takes us now...

Poplar TV Stand: 4

Laminating the top. Next will be the bottom shelf. I found that just gluing two at a time was far easier though I was initially tempted to try all three at once. I'm glad a went with the former.


Poplar TV Stand: 3

The frame is coming together nicely. I got a crazy idea to test my joinery skills and try a sort of dovetail style joint for the cross piece of the bottom shelf. I'm pleased to report it worked out quite nicely and provided a nice tight fit.